DIY: How to transform your student room
In my second year student house, I had the box room – a thin rectangle that could barely fit in a double bed and a desk, complete with a frosted window. However, I was determined to make my little cell conform to my rather girly aesthetic. On a small budget, it might seem like an impossible task, but a little ingenuity, creativity, and some DIY-skills can go a long way. Here are a few easy projects that you can try in your own student house!
Upcycled Shelving Unit
Total cost: £20
Difficulty: Easy
Time spent: 4-6hrs (with drying and assembly time)
This is an unbelievably simple project and the result is a practical and stylish storage solution – perfect for a cramped student house. All you need is a metal shelving unit (HYLLIS from IKEA was only £10 and fitted my required dimensions perfectly), some patterned sticky-back plastic (I bought a grey marble print design from Wilko for £4, but other prints are available in places like B&Q and Amazon) and some metallic spray paint.
- Using the shelves as a template, cut the sticky back plastic into rectangles to cover the top and sides of the shelves, and cut slits in the corners so the plastic can wrap around the sides easily.
- Carefully peel off the paper backing and stick the plastic to the shelves, using a plastic ruler to push out any air bubbles as you go along.
- Next spray-paint the posts, following the advice and safety instructions on the can, and leave to dry fully.
- Finally put it all together according to the assembly instructions and enjoy your brand-new bookcase!
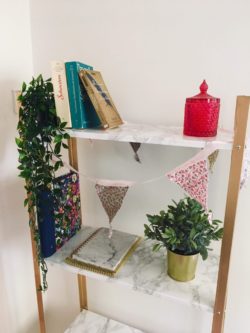
DIY bunting and shelves (Image: Sophie Laughton)
Homemade Bunting
Total cost: up to £5
Difficulty: Easy-Medium
Time spent: under 1 hr
It doesn’t matter if you have great sewing skills or not, bunting is an enormously easy DIY project that adds a bit of whimsy to any room. In order to make your own, you need some fabric offcuts (if you have some old clothes with a nice pattern on this is perfect, but offcuts can be easily bought at a haberdashery or craft store), some thick ribbon, sharp scissors and a basic sewing set.
- Start out by using a piece of card to make a basic template of the shape you would like your bunting to be in – traditionally a long triangle, but you could also try other designs like rectangles or hearts.
- Then use this to cut out matching shapes in your chosen fabrics. If your fabric is thin and flimsy, cut out two shapes in matching fabric, and sew back to back.
- When you have all your pieces ready, pin them to your ribbon at regular 10cm intervals – the ribbon can be as long as you like, but if the intervals are longer than 10cm then the bunting can look quite sparse.
- To sew the flags to the ribbon, fold the ribbon in half to cover both sides of top edge and sew a long running stitch or backstitch all the way along the whole length of the ribbon. Alternatively keep the ribbon full width and simply sew a running stitch across the top of each individual flag. If you have an iron or a pair of straighteners handy, you could always use hemming tape for this step. Now it’s finished, simply hang up in your student house!
Wall hangings
Total cost: up to £5
Difficulty: Incredibly easy
Time spent: About 5 mins
Often landlords are fussy about putting up anything on the walls that might leave a mark – so hooks, Blu Tack or sticky tape are out, leaving walls looking bare. But there are easy ways to get around it without damaging any paintwork. If you are looking to hang up a tapestry or wall hangings, you will need some poster hanging strips (available from Wilko or Amazon), some strong glue and some pegs (wooden craft look best but plastic ones work fine).
- Simply glue the pegs to the poster hanging strips and, once fully dry, stick the strips to the wall following the instructions on the pack.
- Use the pegs to hang up your tapestry.
TIP: You can use the same trick to hang up bunting – use some mini craft pegs and cut the hanging strips down to size, being sure to leave the removal tab attached.
For an easy way to stick posters or postcards to the wall, you just need a roll of painters’ tape and some Blu Tac. Rather than sticking your postcards straight onto the wall, simply stick down a little square of painters’ tape where you want to put your postcard first, and then use the Blu Tack on top. When its time to leave, simply peel off and your landlord will be none the wiser!
Comments (1)