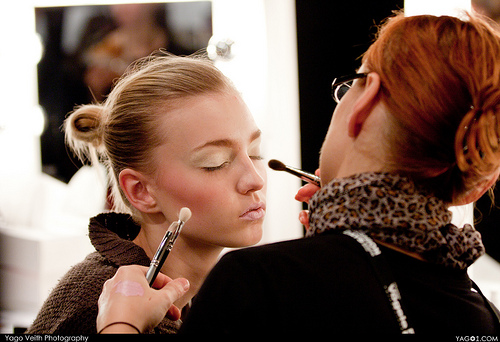
The Lifestyle Make-Up Guide
Although the weather has been behaving lately; it cannot be denied that weather in England is extremely temperamental and unreliable, with the four seasons never following their correct timings. So, whilst purchasing new make-up, I kept the versatility of the products in mind, which has enabled me to produce make-up looks, which with a few variations, can be worn all year round!
Below I have provided my favourites-one look for each season-which can be switched around accordingly dependent on the weather; the spring look could be worn on a cooler summer’s day. With tips for variations dependent on skin tone and hair colour, as well as variations for day and night, these 4 simple looks are proved suitable for everyone, so begin experimenting!
Winter
 Step 1: Apply your base. Here, I have begun by applying moisturiser, before blending in foundation and finally brushing over the face with powder foundation to increase coverage and set the look.
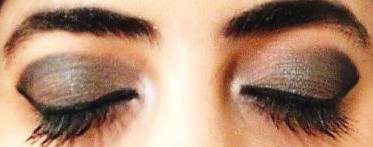
Step 2: Apply the white eyeshadow over the whole eyelid, especially the inner corners. This will act as a primer for the actual eyeshadow colours and the inner corner coverage will open up your eyes, allowing them to appear larger, drawing extra attention to them.
Step 3: Apply the light grey colour over the whole eyelid, excluding the inner eye.
Step 4: Starting from the outer eyelid draw a mini sideways V like so < with the darker grey and blend this in softly to the light grey, up until roughly the middle of your eyelid. Intensify at the crease near the  brow bone and blend well.
Step 5: Next, apply black eyeshadow in a smaller < shape on the outer eyelid again filling in up to the brow bone whilst blending in to the darker grey. This should result in a three tone look which intensifies more, the further you get to the outer eyelid.
Step 6: Apply black top liner above the top lashes, creating a flick that meets the end of the eye shadow.
Step 7: Use the black eye pencil along the water line and beneath the lower lashes to intensify further.
Step 8: Curl eyelashes, before applying mascara. Here two types have been used; one to flick and shape the lashes and the other to volumise and dramatize them.
Step 9: Apply the lipstick, lightly blending it in with your finger for a tinted lip colour. Then the look is complete, so head out and show it off!
Tips for Variations:
Daytime- Switch the darker grey and black eyeshadow shades to smoky browns and leave the waterline and beneath the lashes clear.
Night-time- Use false lashes and change the lip colour to a tint of red lipstick (a very slight tint for those with dark hair and fair skin)
Pale Skin- Apply the eyeshadow without layering too much, using more of the lighter shades, but for those with blonde hair, darker eyeshadow shades may still work.
Darker Skin- Intensify the eyeshadow by using more of the darker shades and apply bronzer to dress up the look further.
Make –up products used:
- Rimmel Lasting Finish 25hr Foundation- in the shade Ivory 100 (£6.99)
- L’oreal Paris True Match Powder- in the shade Rose Ivory R1-C1 (£8.19)
- Bourjois Paris ‘little round pot Eyeshadow’ in White, shade 90 (£6.49)
- Avon True Colour Eyeshadow Quad in ‘Smokey Eyes’ (only light grey was used from this) (£8.50)
- MUA Pearl Eyeshadow in Shade 12 (This was used for the darker grey) (£1.00)
- Sleek iDivine Eyeshadow Set in ‘Sunset’ (The black was used from this) (7.99)
- Soap And Glory ‘Supercat Carbon Black Extreme Eyeliner Pen’ (Topliner-£6.00)
- Rimmel Soft Khol Kajal Eye Pencil in Jet Black (£2.99)
- Maybelline Volum’ Express Cat Eyes mascara (£5.99)
- Max Factor 2000 Calorie Mascara in Black (£7.99)
- Rimmel Lasting Finish Lip Stick in ‘One Of A Kind’ 080 (£4.99)
Autumn
 Step 1: Apply your base. Here, I have begun by applying moisturiser, before blending in foundation and finally brushing over the face with powder foundation to increase coverage and set the look.
Step 2: Apply bronzer sweeping upwards along the cheekbones to contour and add colour to the face, blending into to the powder foundation with the brush.
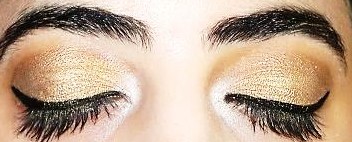
Step 3: Next, apply the white eye shadow over the whole eyelid, especially the inner corners. This will act as a primer for the actual eye shadow colours and the inner corner coverage will open up your eyes, allowing them to appear larger, drawing extra attention to them.
Step 4: Apply the sparkly gold shade of eyeshadow over the whole eyelid, excluding the inner eye.
Step 5: Starting from the outer eyelid draw a mini sideways V like so < with the medium brown and blend this in softly  to the sparkly gold, up until roughly the middle of your eyelid. Intensify at the crease near the brow bone and blend well.
Step 6: Next, apply the matte dark brown eyeshadow in a much smaller < shape on the outer eyelid again filling in up to the brow bone whilst blending in to the medium brown. This should result in a three tone look which intensifies more, the further you get to the outer eyelid.
Step 7: Apply black top liner above the top lashes, creating a flick that meets the end of the eye shadow. (See above image)
Step 8: Use the black eye pencil along the water line and beneath the lower lashes to intensify further.
Step 9: Curl eyelashes, before applying mascara. Here two types have been used; one to flick and shape the lashes and the other to volumise and dramatize them.
Step 10: Finally, apply the lipstick, with the optional use of lip liner beforehand for those with smaller lips, to allow them to appear larger.
Tips for Variations:
Daytime- Leave the waterline and beneath the lashes clear. Replace the red lipstick with a nude/ more natural shade. Alternatively, for an autumn feel, try a tint of purple/cherry tones on the lips.
Night-time- Use false lashes and intensify the eyes with an increased amount of eyeshadow; using more of the darker shades if you have fair skin, and more of the lighter shades if you have darker skin, to allow the eyes to stand out further.
Pale Skin- The red may appear too heavy, in which case use a purple/cherry toned lipstick, especially if you are a redhead and are wearing this look in the daytime.
Darker Skin- Apply blush as well as bronzer, but only if you are excluding the red lips. To brighten up the eyeshadow which may blend in with your skin tone, use more of the medium brown/gold and replace the matte dark brown with a sparkly one, as well as applying highlighter to the brow bone.
Make –up products used:
- Rimmel Lasting Finish 25hr Foundation- in the shade Ivory 100 (£6.99)
- L’oreal Paris True Match Powder- in the shade Rose Ivory R1-C1 (£8.19)
- MUA Bronzer-Shade 1 (£1.00)
- Bourjois Paris ‘little round pot Eyeshadow’ in White, shade 90 (£6.49)
- Rimmel Traffic Stopping Shadow in “Over The Limit” (the sparkly gold and medium brown were used from this) (£6.49)
- Revlon ColorStay 16 Hour Eye Shadow Quad – in “515 Adventurous” (The dark brown was used from this) (£7.00)
- Soap And Glory ‘Supercat Carbon Black Extreme Eyeliner Pen’ (Topliner-£6.00)
- Rimmel Soft Khol Kajal Eye Pencil in Jet Black (£2.99)
- Maybelline Volum’ Express Cat Eyes mascara (£5.99)
- Max Factor 2000 Calorie Mascara in Black (£7.99)
- Rimmel Lasting Finish Lip Stick by Kate Moss, in red- shade 01 (£5.49)
Spring
 Step 1: Here, the skin make-up will need close attention, as it needs to appear bright and natural. Begin by applying moisturiser, before applying a minimal amount of foundation, which should be blended as much as possible into the skin. Then brush over only the significantly shiny/oily parts of the face with powder, to even out the appearance of the skin.
Step 2: Apply blusher to the apples of your cheeks blending upwards slightly to give some colour to the face, which should appear somewhat similar to natural rosy cheeks.
Step 3: Apply the white eye shadow very lightly in the inner corners of the eyes. This will open up your eyes, allowing them to appear naturally larger and brighter, drawing extra attention to them.
Step 4: Curl eyelashes, before applying mascara. Here  two types have been used; one to flick and shape the lashes and the other to volumise and dramatize them, opening up the eyes further.
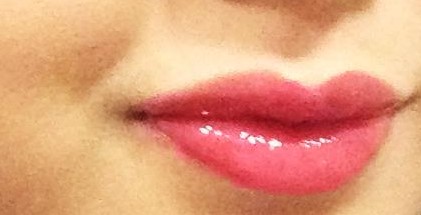
Step 5: Apply the lip gloss heavily, intensifying it on the outer lip line. This will add a splash of bright Spring colour to the look, fitting in with the rest of the make-up perfectly!
Tips for Variations:
Daytime- The look is a natural, fresh-faced, Spring daytime look, but to simplify it further replace the hot pink lips with a nude shade/lighter pink lipstick/gloss.
Night-time- Use false lashes and apply a sweep of thick black top-liner with the “cat-eye” flick to make the look bold. Also blend in white eyeliner on the waterline and beneath the lashes. Replace the gloss with a hot pink lipstick and contour cheekbones with a hint of bronzer. This way the look still remains Spring-like and natural but is just that bit heavier.
Pale Skin- Stay light on the blusher. If you have light hair which may make the look appear even more natural, may be apply false lashes and white eyeliner on the waterline, even for a daytime look.
Darker Skin- If the lip-shade doesn’t have the same effect, choose another eye-catching pink shade and use lipstick instead of gloss to allow the colour to stand out more against your skin.
Make –up products used:
- Rimmel Lasting Finish 25hr Foundation- in the shade Ivory 100 (£6.99)
- L’oreal Paris True Match Powder- in the shade Rose Ivory R1-C1 (£8.19)
- Bourjois Paris ‘little round pot Blush’ in Jasper Rose, shade 95 (£7.49)
- Bourjois Paris ‘little round pot Eyeshadow’ in White, shade 90 (£6.49)
- Maybelline Volum’ Express Cat Eyes mascara (£5.99)
- Max Factor 2000 Calorie Mascara in Black (£7.99)
- Rimmel Vinyl Lip Gloss, in “Pin Up” 190 (£4.99)
Summer
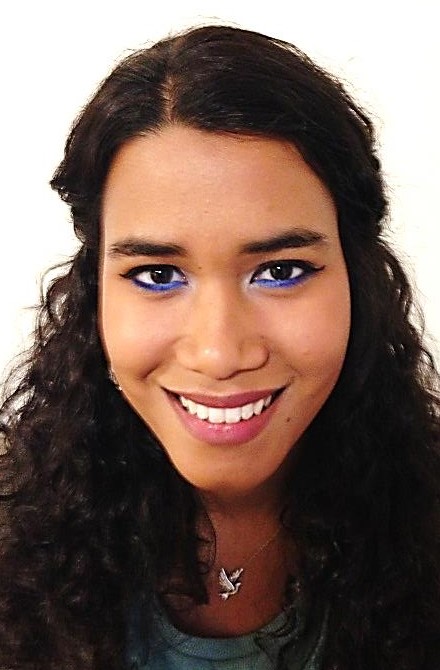 Step 1: Here, if the weather is warm, the skin should appear dewier, so start by applying moisturiser before blending in foundation, leaving out the powder completely.
Step 2: Next, for that summer glow, apply bronzer, sweeping upwards along the cheekbones, which will also contour the face.
Step 3: Apply the white eye shadow very lightly in the inner corners of the eyes. This will open up your eyes, allowing them to appear naturally larger and brighter, drawing extra attention to them.
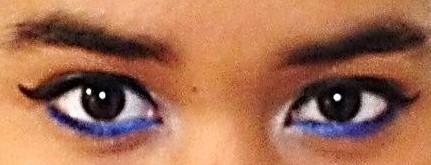
Step 4: Then apply the purple eyeliner on the outer part of the waterline as well as beneath the lashes, up until mid-waterline. Blend in the dark blue eyeliner from mid-waterline up until the inner corners of the eyes. To brighten this up, apply white eyeliner from the inner 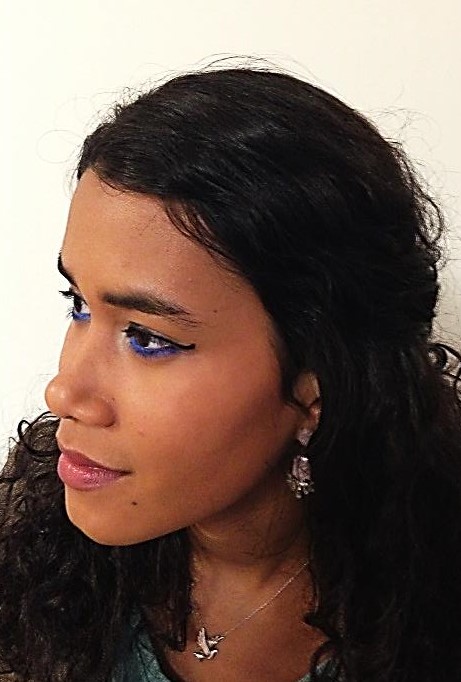 corner s almost up until the mid-waterline blending it in with the dark-blue. This will create a 3 toned colourful summery look- as shown above.
Step 5: Apply a sweep of top liner, flicking out from the corners to dramatize the look.
Step 6: Apply lashings of mascara to the lashes, to open up the eyes further, drawing more attention to the colours used.
Step 7: Apply the lipstick heavily to add a splash of neutral colour, finishing off the look!
Tips for Variations:
Daytime- This look is a colourful, Summery daytime look, but to mix it up a bit; change the coloured eyeliner colours and mixes. Maybe try a bottle green, purple and white.
Night-time- Use a bolder lipstick colour and apply false lashes to dress this look up for a still Summer’s night. Alternatively, for advanced make-up wearers, replace the coloured eyeliner with simple black eyeliner along the waterline and beneath the lashes. Then choose 3 bright shades of eyeshadow to create a more intense tropical eye.
Pale Skin- Stay light on the bronzer to keep the skin-make up looking naturally dewy and bronzed. Use colours that suit your eye colour and skin-tone more. So for brown/hazel/ blue eyes and light/dark hair, the colours used in this look are perfect. For green/ hazel green eyes, try differing shades of green together or with purple rather than blues. The lipstick suggested may appear as too colourful with the eyes, so instead use a bronze/brown shade of lipstick to neutralise the colour balance
Darker Skin- Experiment more with eyeliner colours, braving to use oranges/ yellows with dark blues/purples, which will look amazing with your skin tone and even more summery.
Make –up products used:
- Bourjois Healthy Mix Serum Gel Foundation, Shade 58, Dark Bronze (£10.99)
- NYC Sun 2 Sun Bronzer Terratoca Tan (£2.99)
- Bourjois Paris ‘little round pot Eyeshadow’ in White, shade 90 (£6.49)
- GOSH Water-proof Velvet Touch Purple Stain Eyeliner (£4.99)
- MUA Intense Colour Eyeliner Pencil in Royal Blue (£1.00)
- MUA Intense Colour Eyeliner Pencil in Snow White (£1.00)
- Soap And Glory ‘Supercat Carbon Black Extreme Eyeliner Pen’ (Top liner-£6.00)
- Max Factor 2000 Calorie Mascara in Black (£7.99)
- Rimmel Lasting Finish Lip Stick by Kate Moss, in shade 19 (£5.49)
So, what are you waiting for? Try out these looks for easy, new and exciting make-up combinations!
Comments