Turn summer sun into art: the lazy artist’s guide to botanical prints
As soon as the sun rises, people spill from their homes and scatter across the parks like shadows retreating from the light. For some, summer means tilting their faces toward the sky, sunglasses perched low, and allowing the heat to tan their skin. For others, it’s about tote bags filled with sketchbooks and cameras, an attempt to capture how light fractures through low-hanging leaves or graces the shoulders of sun-drunk strangers. However, canvas bags cling to your arms in the humidity, and lenses glare with price tags. Art doesn’t have to be that complicated—not when the sun is urging you to use it as a tool for creation. For anyone eager to create, summer is the time to set aside the usual tools and let the season do half the work. Why sketch the light when you can trap it on paper instead?
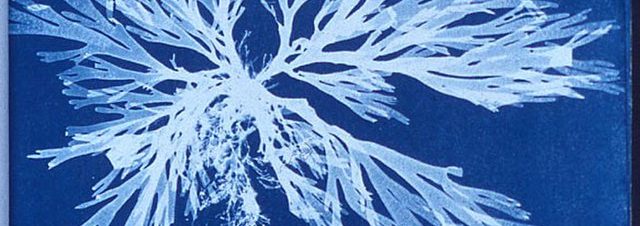
Her passion for botany led to cyanotype photography becoming one of the most accessible means to document specimens
Consider Anna Atkins, for example. In 1843, Atkins established herself as a botanical artist and was the first person to illustrate a book using photographic images. As a dedicated illustrator, she soon began experimenting with cyanotype photographs of British plants. Her nineteenth-century work employed light exposure to create intricate blueprints of the flora surrounding her. The field of botany she pursued was one of the few subjects within science regarded as a suitably genteel hobby for women during the mid-nineteenth century. Her passion for botany led to cyanotype photography becoming one of the most accessible means to document specimens. She self-published her botanical images in her 1843 book, Photographs of British Algae: Cyanotype Impressions, which soon became the first book ever printed and illustrated using photography. However, cyanotypes were initially developed by Sir John Herschel, a family acquaintance of Atkins, and were extensively utilised by engineers to produce copies of plans, which is where the term ‘blueprint’ originates from.
Creating cyanotypes is a simple, camera-less method of producing photographs: it is a process that combines both art and science to generate a beautiful image. The cyanotype process employs a mixture of iron compounds, including ammonium ferric citrate and potassium ferricyanide, applied to paper to render it sensitive to UV light. This means that when you place your chosen object on the paper, the sun will interact with the chemicals it can reach, oxidising them and transforming the paper blue, leaving a clear imprint of the object behind.
While the sound of chemicals may be frightening, this is where modern advancements excel: you can purchase pre-coated Cyanotype Paper on Amazon to simplify your process. Alternatively, for those who wish to coat the paper themselves, a Cyanotype Kit is also available on Amazon; just ensure to apply the coating in a dark environment, using a foam brush for an even finish. Once your paper is prepared, head to the park to select your favourite flower, leaf, or even a stray plastic wrapper for bonus points on recycling. Position it on your prepared paper and place a piece of glass over the top to capture as much detail in the image as possible. Leave your paper arrangement in the sun until it starts changing colour. When the exposed area turns a pale bronze, rinse the paper in water for two minutes. This will fix the exposed image, making it safe to view in daylight once dry. Your final product should be an imprint of your object atop a blue wash where the sun has interacted with the chemicals.
If you’re interested in exploring a similar process that utilises natural plant pigments instead of chemicals, anthotype prints are the perfect option. It was Mary Somerville, one of the first female honorary members of the Royal Astronomical Society, whose important research on the “action of rays” used the spectrum of light to determine the effect it had on vegetable juices, which kick-started anthotype prints. She realised that the juice of the same plant would react differently depending on whether the pigment was extracted in water or alcohol. With this information, Sir John Frederick William Herschel, the first person to successfully fix photographs, discovered that hyposulfite of soda could also be used. He was key in the discovery of the anthotype process, also called “Herschel’s flower-essence prints.” His goal was to advance colour photography through experiments with plants and the bleaching effects of sunlight; he sought to find which extracts could produce a specific tint under a certain wavelength of light. Although his research did not gain as much popularity as cyanotypes due to its long exposure time, we can create our own using items from our kitchen and garden, thanks to modern research.
For those who wish to try anthotypes at home, there are three steps: create an emulsion, prepare the canvas, and begin printing
For those who wish to try anthotypes at home, there are three steps: create an emulsion, prepare the canvas, and begin printing. The first step is to create an emulsion. Don’t worry, this is much less daunting than it sounds. An emulsion is a light-sensitive mixture made from crushed plant materials: for instance, turmeric, spinach, red cabbage, and blackberries—items that can be found in your garden or kitchen. If you’d like to take the flowery route, flower petals from poppies, dandelions, pansies, and marigolds work best. For more ideas, the book Anthotypes – Explore the Darkroom in Your Garden and Make Photographs Using Plants is a great starting point. If the plants or berries are too dry, dilute them with either tap water or some inexpensive vodka. The next step is to crush and mix or use a blender to create the emulsion. For a smooth finish on your final print, strain the anthotype emulsion through a cotton cloth. Alternatively, you could skip this step for a more organic effect with bits of the peel and petals remaining on your final print!
The second step is to prepare the canvas. Obtain some heavyweight watercolour paper, as it will be exposed to the sun for an extended period. You can either brush the emulsion onto the paper or dip it into the emulsion, depending on whether you’d like to showcase the brush strokes for a more abstract approach or prefer an even coat. Finally, prepare the object you wish to leave an imprint on the paper—like creating a negative, similar to cyanotypes. Then, simply go outside and take your project to enjoy the sun with you.
The amount of time it takes for an anthotype print to develop in the sun depends on the type of product used for the emulsion. Turmeric, red wine, spinach, and dandelions yield the quickest results due to their high photosensitivity and vibrant colours. Unlike cyanotypes, you won’t need to wash your print afterwards. Once you believe it’s finished developing, and the contrast in colour between the canvas and negative object is perfect, simply hang it on your wall or glue it down in a sketchbook.
There’s something satisfying about making art without the usual fuss: no expensive cameras, no endless supplies, just paper, whatever’s lying around, and a willingness to let chemistry and daylight do the heavy lifting. Cyanotypes and anthotypes turn the whole process into something between a science experiment and a lazy afternoon in the park—which, really, is how art should feel sometimes. No pretension, no pressure, just the slow reveal of an image as the sun burns it into existence. The best part? Unlike a tan, these prints won’t fade by September.
Comments